| Using the Fee Timer | 
|

|

|

|

|

|
The Fee Timer is used to time a billable event such as a phone call or office conference. When the event has completed, the timer can be stopped and a fee transaction can be entered.
The Fee Timer is included at the top of the Fee data entry window. Each Fee data entry window can have its own timer running thus allowing for multiple timers running at the same time.
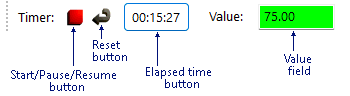
Note: The Value field is only displayed when performing data entry using the Detail data entry mode.
Starting the Timer
The timer can be started by clicking the  button or pressing Alt+B. A message will be displayed if another timer is already running thereby allowing
you to pause the first timer before continuing if desired. Once started, the button changes to a
 button and the color of the Value field changes to green. As the timer is running, the elapsed
time is shown on the Elapsed Time button and in the title bar in an HH:MM:SS (Hours:Minutes:Seconds)
format. Once a Rate is entered for the fee transaction, the Value field is updated. The Elapsed Time button
and Value field are updated every second (even if the Fee data entry window is not in focus).
Depending on the values entered in Customization for the minimum
time and the rounded
time increment, the Value field may not increase immediately.
Pausing the Timer
When the timer is running, you can click the button (or Alt+B) to pause the timer. Once paused, the button changes to a button and the color of the Value field changes to yellow.
Resume Timing
When the timer is paused, you can click the button (or Alt+B) to resume timing an event. Once resumed, the button changes to a button and the color of the Value field changes to green.
Adding Elapsed Time to the Hours fields
Clicking the Elapsed Time button or Alt+A will add the elapsed time on the timer to the Hours Worked and Hours to Bill fields. You will be asked if you want to add the Value to the Amount field. Click Yes to add the Value to the Amount field. Otherwise, click No if you do not want the Amount field changed. After specifying whether you want the Amount field adjusted, the timer will be stopped and reset to 0.
Note: When the current fee has been included on a final statement, the Elapsed Time button will be dimmed and unavailable. To add the elapsed time, select a fee that has not been included on a statement or create a new transaction.
Note: If you do not have access rights to add or change a fee, the Elapsed Time button will be dimmed and unavailable.
Resetting the Timer
The  button or Alt+T can be used to reset the timer by stopping the timer and resetting the Elapsed Time and Value back to 0. A message will be displayed asking if you are sure you want to reset the timer. Otherwise, click Yes if you want to reset the timer back to 0. Click No if you want to retain the current Elapsed Time and Value.
Select the Do Not Show Again check box if you do not want the message displayed each time you reset a timer. Once this check box has been selected by a user, this message box can be reinstated by running the Reset Optional Messages program.
Once a timer has been reset, click the button if you want to restart the timer.
Note: If you close a Fee Entry window while the timer is running, a message will be displayed indicating that the accumulated time will be lost. If you click OK, the Fee Entry window will be closed and the time will be lost. If you click Cancel, the Fee Entry window will not be closed and the timer will continue running.
 ) are registered trademarks of Software Technology, LLC.