| Payment Allocation | 
|

|

|

|

|

|
 How to Access
|
|||||||||||||||||||||
Tabs3 Billing automatically allocates a payment at the time of entry when there are amounts due. However, there
may be instances where you want to manually allocate a payment to a specific due amount or you want to
verify how a payment is allocated. When in the Payment entry window, the  button or Alt+P is used to open a Payment Allocation window for the selected unprocessed
payment. The Payment Allocation window allows you to review the client's billed amounts, due amounts,
current payment allocation amounts, and the balance due amounts after the allocations have been applied.
You can manually allocate the payment to accounts receivable totals and individual statements. You can
also view the fee compensation allocation amounts based on the rules defined in the client's fee
compensation rules table. (Note: An Amount must be specified in the Payment entry window in order
to open a Payment Allocation window.)
Note: If you want to see how a processed payment has been allocated, you can run an Allocated Payments Report or a Cash Receipts Report.
The Payment Allocation window consists of three panes - Tree Control, Payment Information, and Allocation Breakdown.
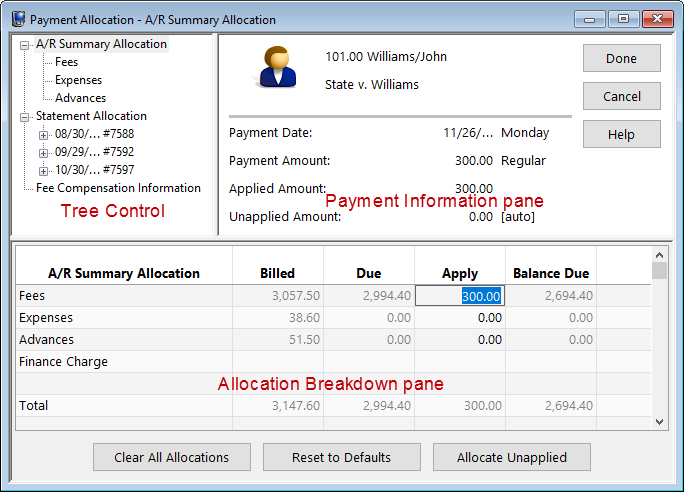
In the Tree Control, you can select the area for which you want to view or edit payment allocation. The information displayed in the Allocation Breakdown pane will change depending on what is selected in the Tree Control. The following allocation groups can be selected:
- A/R Summary Allocation
- A/R Summary Allocation: Fees
- A/R Summary Allocation: Expenses
- A/R Summary Allocation: Advances
- Statement Allocation
- Statement Allocation: Specific Statement
- Statement Allocation: Specific Statement: Fees
- Statement Allocation: Specific Statement: Expenses
- Statement Allocation: Specific Statement: Advances
- Fee Compensation Information
Clicking the plus (+) symbol next to the name of an allocation group (e.g., "A/R Summary Allocation") or pressing the Right-Arrow key expands the group to display a more detailed selection (e.g., "Fees", "Expenses", and "Advances"). Likewise, clicking the minus (-) symbol next to the name of an expanded group or pressing the Left-Arrow key will collapse that group, hiding its contents from view.
The F6 key can be used to toggle between the Tree Control and the Allocation Breakdown pane in the Payment Allocation window.
The Payment Information pane displays the Client
ID, Name, and Work Description of the client. Clicking the  button will open the Client
Information window for the selected client. The information in this pane cannot be directly edited.
However, changing payment allocations in the Allocation Breakdown pane will automatically adjust the Applied
Amount and Unapplied Amount displayed in this pane.
The following fields are also included in this section:
| Payment Date | The date specified for the payment in the Date field from the Payment Entry window. The day of the week will be displayed to the right of the payment date. |
| Payment Amount |
The amount specified for the payment in the Amount field from the Payment Entry window. The following label will be displayed to the right of the amount indicating the payment tcode type: Regular - Type 1 payments Fee - Type 2 payments Expense - Type 3 payment with a transaction type of Expense Advance - Type 3 payment with a transaction type of Advance |
| Applied Amount | The amount of the payment that has been applied to the client's balance due amounts. The amounts in the Apply column in the Allocation Breakdown pane represent the Applied Amount. |
| Unapplied Amount | The amount of the payment that has not or cannot be applied to the client's balance due amounts. |
Note: The Applied Amount and the Unapplied Amount make up the total payment amount when added together.
The Done button or Alt+D will close the Payment Allocation window and save any allocation changes that were made to the payment during the current session.
The Cancel button will close the Payment Allocation window without saving any allocation changes that were made to the payment during the current session.
The Allocation Breakdown pane is where you can view the automatic allocations or manually allocate the selected payment. The information displayed in the Allocation Breakdown pane will change depending on what allocation group is selected in the Tree Control. For example, when A/R Summary Allocation is selected in the Tree Control, the Allocation Breakdown pane will display the payment allocation broken down into total Fees, Expenses, Advances and Finance Charge rows. If you were to select Fees under A/R Summary Allocation in the Tree Control, the Allocation Breakdown pane will display the payment allocation to fees broken down by individual working timekeeper.
The Clear All Allocations button is used to remove all the current payment allocations for the selected payment, thus changing the Applied Amount to 0.00 and the Unapplied Amount to match the payment amount. This button is useful if you want to manually apply the entire payment.
The Reset to Defaults button will clear the current allocations and reallocate the payment automatically based on the client's Method to Apply Payments and fee compensation rules.
The Allocate Unapplied button will allocate the unapplied payment amount based on the client's Method to Apply Payments and fee compensation rules. This button is useful in the event you want to manually allocate a portion and then let Tabs3 automatically allocate the remainder.
The F2 key can be used to automatically enter the appropriate balance due figure in the Apply field based on the unapplied amount of the payment and the due amount shown for the row.
The F6 key can be used to toggle between the Tree Control and the Allocation Breakdown pane in the Payment Allocation window.
Note: Only the payment amounts in the Apply column can be manually edited.
| See also: | Examples of the Allocation Breakdown Pane |
| Sales Tax Allocation | |
| Keystrokes |
 ) are registered trademarks of Software Technology, LLC.